Wire Inflation
Overview
The goal of wires package is to provide an easy way of modeling frame
structures. A frame structure can be uniquely define by 3 parts:
- Vertex positions
- Topology/Connectivity
- Edge/vertex thickness
Given these 3 parts as input, we implement a very efficient algorithm proposed by George Hart to generate the output triangular mesh.
The wires involves just 3 main classes: WireNetwork, Inflator and
Tiler. Understanding these 3 classes would allow one to generate wide variety
of frame structures. In a nutshell, vertex positions and topology are encoded in
the WireNetwork data structure. The Inflator class takes a WireNetwork
object and its corresponding thickness assignment as input, and it outputs an
triangular mesh. The Tiler class takes a WireNetwork object as a unit
pattern and tile it according to certain rules, and its output is the tiled
WireNetwork object.
WireNetwork
WireNetwork class represents the vertex positions and topology of a frame
structure. It can be easily modeled by hand or using tools such as
blender.
Construction from data:
To create a WireNetwork object, we just need to provide a set of vertices and a set of edges:
>>> vertices = np.array([
...     [0, 0, 0],
...     [1, 0, 0],
...     [0, 1, 0],
...     [1, 1, 0]
...     ])
>>> edges = np.array([
...     [0, 1],
...     [1, 3],
...     [2, 3],
...     [2, 0]
...     ]);
>>> wire_network = pymesh.wires.WireNetwork.create_from_data(
...     vertices, edges)
Notice that edges is a list of vertex index pairs, and vertex index starts
from 0.
Construction from file:
Alternatively, one can use .obj format to encode a wire networks:
# Filename: test.wire
v 0.0 0.0 0.0
v 1.0 0.0 0.0
v 0.0 1.0 0.0
v 1.0 1.0 0.0
l 1 2
l 2 4
l 3 4
l 3 1
Lines starting with v are specifies vertex coordinates, and lines starting
with l are edges. Notice that indices starts from 1 in .obj files. One
advantage of using the .obj format to store wire network is that it can be
opened directly by Blender. However, to distinguish with triangular mesh, I
normally change the suffix to .wire.
To create a wire network from file:
>>> wire_network = pymesh.wires.WireNetwork.create_from_file(
...     "test.wire")
Empty wire network and update data:
Sometimes it is useful to create an empty wire network (0 vertices, 0 edges):
>>> empty_wires = pymesh.wires.WireNetwork.create_empty()
Once created, the vertices and edges of a WireNetwork are generally read-only
because updating the geometry typically invalidates vertex and edge attributes
such as edge lengths. However, it is possible to assign an entirely new set of
vertices and edges to a WireNetwork object using the load and
load_from_file method:
>>> wire_network.load(vertices, edges)

>>> wire_network.load_from_file("test.wire")
Accessing vertices and edges:
Once a WireNetwork object is created, one can access the vertices and edges
directly:
>>> wire_network.dim
3
>>> wire_network.num_vertices
4
>>> wire_network.vertices
array([[ 0.,  0.,  0.],
       [ 1.,  0.,  0.],
       [ 0.,  1.,  0.],
       [ 1.,  1.,  0.]])

>>> wire_network.num_edges
4
>>> wire_network.edges
array([[0, 1],
       [1, 3],
       [2, 3],
       [2, 0]])
Vertex adjacency:
One can easily access vertex adjacency information by get_vertex_neighbors
method:
>>> wire_network.get_vertex_neighbors(vertex_index)
array([1, 9])
This method can also be used for computing vertex valance (i.e. the number of neighboring vertices).
Attributes:
Just like the Mesh class, it is possible to define attribute to represent scalar and vector fields associated with each vertex and edge. For example:
>>> vertex_colors = np.zeros((wire_network.num_vertices, 3));
>>> wire_network.add_attribute("vertex_color", vertex_colors)
>>> print(wire_network.get_attribute("vertex_color"));
array([[ 0.,  0.,  0.],
       [ 0.,  0.,  0.],
       [ 0.,  0.,  0.],
       [ 0.,  0.,  0.]])
All attribute names can be retrieved using the attribute_names attribute:
>>> wire_network.attribute_name
("vertex_color")
Symmetry orbits:
It is sometimes important to compute the symmetry orbits of the wire network:
>>> wire_network.compute_symmetry_orbits()
This command adds 4 attributes to the wire network:
vertex_symmetry_orbit: Per-vertex scalar field specifying the orbit each vertex belongs to . Vertices from the same orbit can be mapped to each other by reflection with respect to axis-aligned planes.vertex_cubic_symmetry_orbit: Per-vertex scalar field specifying the cubic orbit each vertex belongs to. Vertices from the same cubic orbit can be mapped to each other by all reflection symmetry planes of a unit cube.edge_symmetry_orbit: Per-edge scalar field specifying the orbit each edge belongs to. Edges from the same orbit can be mapped to each other by reflection with respect to axis-aligned planes.edge_cubic_symmetry_orbit: Per-edge scalar field specifying the cubic orbit each edge belongs to. Edges from the same cubic orbit can be mapped to each other by reflection with respect to reflection symmetry planes of a unit cube.
These attributes can be access via get_attribute() method:
>>> wire_network.get_attribute("vertex_symmetry_orbit")
array([ 0.,  0.,  0.,  0., 1., 1., 1., 1.])
In the example above, vertex 0 to 3 belongs to orbit 0, and vertex 4 to 7 belongs to orbit 1.
Miscellaneous functions:
The WireNetwork class also have a list of handy built-in functionalities.
To access axis-aligned bounding box:
>>> bbox_min, bbox_max = wire_network.bbox
>>> bbox_min
array([ 0.   ,  0.   , 0.])
>>> bbox_max
array([ 1.   ,  1.   , 0.])
>>> wire_network.bbox_center
array([0.5, 0.5, 0.0])
To access the centroid of the wire network (average of the vertex locations):
>>> wire_network.centroid
array([0.5, 0.5, 0.0])
To access the edge lengths:
>>> wire_network.edge_lengths
array([1.0, 1.0, 1.0, 1.0])
>>> wire_network.total_wire_length
4.0
To recursively trim all dangling edges (edges with at least one valance 1 end points):
>>> wire_network.trim()
To offset each vertex:
>>> offset_vectors = np.random.rand(
...     wire_network.num_vertices, wire_network.dim)
>>> wire_network.offset(offset_vectors);
To center the wire network at the origin (such that its bounding box center is the origin):
>>> wire_network.center_at_origin()
Wire Inflation
Uniform thickness:
Wire inflation refers to the process of converting a WireNetwork plus some thickness assignment to a triangular mesh. The inflation logic is encapsulated in the Inflator class:
>>> inflator = pymesh.wires.Inflator(wire_network)
Thickness is just a scalar field. It can be assigned to each vertex or to each edge. Here are some example to assign uniform thickness to vertices and edges:
>>> # Assign each vertex with thickness 0.5mm
>>> inflator.inflate(0.5, per_vertex_thickness=True)
>>> mesh = inflator.mesh

>>> # Assign each edge with thickness 0.5mm
>>> inflator.inflate(0.5, per_vertex_thickness=False)
>>> mesh = inflator.mesh
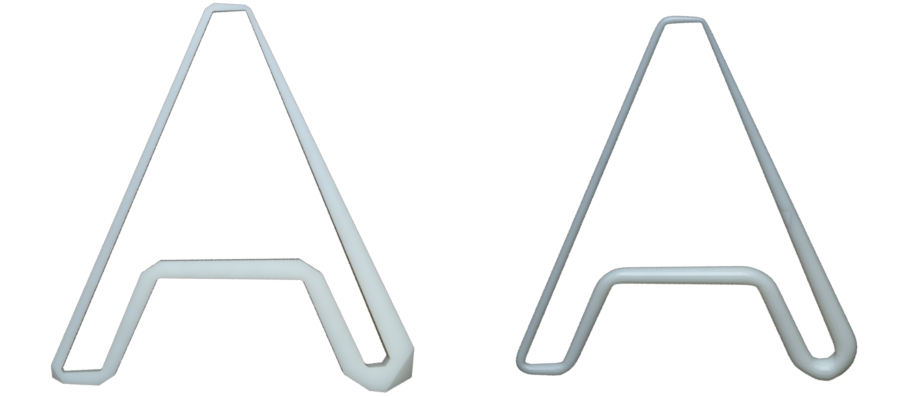
The output mesh look the same due to uniform thickness.

Inflation output for uniform vertex thickness (left) and uniform edge thickness (right).
Because per-vertex and per-edge uniform thickness assignments produce the same
output, one does not need to explicity specify the per_vertex_thickness
flag:
>>> inflator.inflate(0.5)
>>> mesh = inflator.mesh
Variable thickness:
It is also possible to assign a thickness value per-vertex or per-edge:
>>> # Assign each vertex with thickness 0.1 to 0.6
>>> thickness = np.arange(wire_network.num_vertices) / \
...     wire_network.num_vertices * 0.5 + 0.1
>>> inflator.inflate(thickness, per_vertex_thickness=True)
>>> mesh = inflator.mesh

>>> # Assign each edge with thickness 0.1 to 0.6
>>> thickness = np.arange(wire_network.num_edges) / \
...     wire_network.num_edges * 0.5 + 0.1
>>> inflator.inflate(thickness, per_vertex_thickness=False)
>>> mesh = inflator.mesh
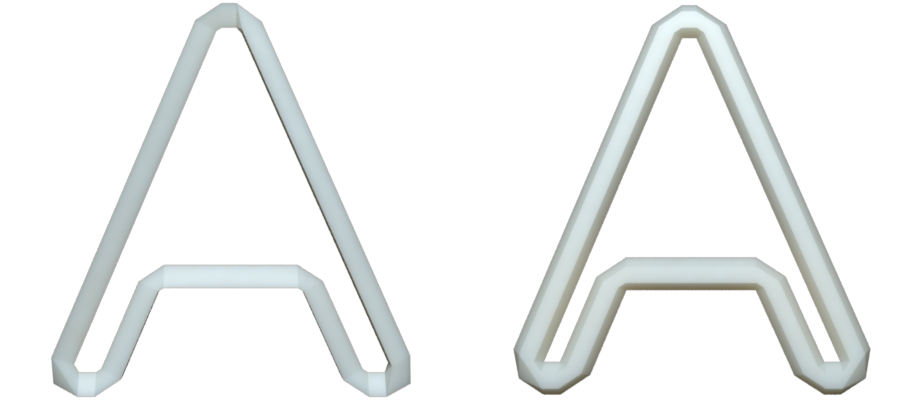
and the output meshes looks like the following:

Inflation output for per-vertex (left) and per-edge (right) thickness.
Refinement:
As one may notice from the figure above, the inflated mesh could contain sharp corners. This may be undesirable sometimes. Fortunately, Inflator class has refinement built-in:
>>> thickness = np.arange(wire_network.num_vertices) / \
...     wire_network.num_vertices * 0.5 + 0.1
>>> inflator.set_refinement(2, "loop")
>>> inflator.inflate(thickness, per_vertex_thickness=True)
>>> mesh = inflator.mesh
The above example refines the output mesh by applying loop subdivision
twice. This create a smooth inflated mesh:
Inflation output without (left) and with (right) loop refinement.
Another refinement method is the simple refinement. The simple
refinement does not smooth the geometry but adds more triangles.
Wire profile:
By default, each wire is inflated to a rectangular pipe with square cross sections. It is possible to use any regular N-gon as the cross section by setting the wire profile:
>>> # Hexagon
>>> inflator.set_profile(6)
>>> mesh = inflator.mesh

>>> # Triangle
>>> inflator.set_profile(3)
>>> mesh = inflator.mesh
Inflation with triangle profile (left) and hexagon profile (right).
Tiling
The Inflator class is capable of inflating arbitrary wire networks. One particular important use case is to inflate a tiled network. The Tiler class takes a single WireNetwork object as input and generate a tiled wire network that can be later inflated. There are several ways to perform tiling.
Regular tiling:
Regular tiling refers to tiling according to a regular grid. To tile a cube of size 15 with a 3x3x3 tiling of a given wire network (e.g. similar to putting a wire network in each cell of a rubic cube):
>>> tiler = Tiler(wire_network)
>>> box_min = np.zeros(3)
>>> box_max = np.ones(3) * 15.0
>>> reps = [3, 3, 3]
>>> tiler.tile_with_guide_bbox(box_min, box_max, reps)
>>> tiled_wires = tiler.wire_network
The output tiled_wires (inflated with thickness 0.5 and refined twice) looks like the
following:
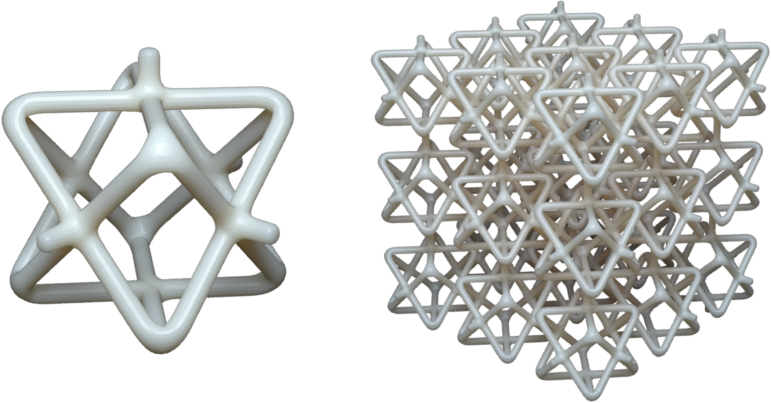
A single cell wire network (left) and the corresponding 3x3x3 tiling (right).
Mesh guided tiling:
It is also possible to tile according to any hexahedron mesh. For example, provided an L-shaped hex mesh:
>>> guide_mesh = pymesh.load_Mesh("L_hex.msh")
>>> tiler = Tiler(wire_network)
>>> tiler.tile_with_guide_mesh(guide_mesh)
>>> tiled_wires = tiler.wire_network
The output (inflated with thickness 0.5 and refined twice) looks like:
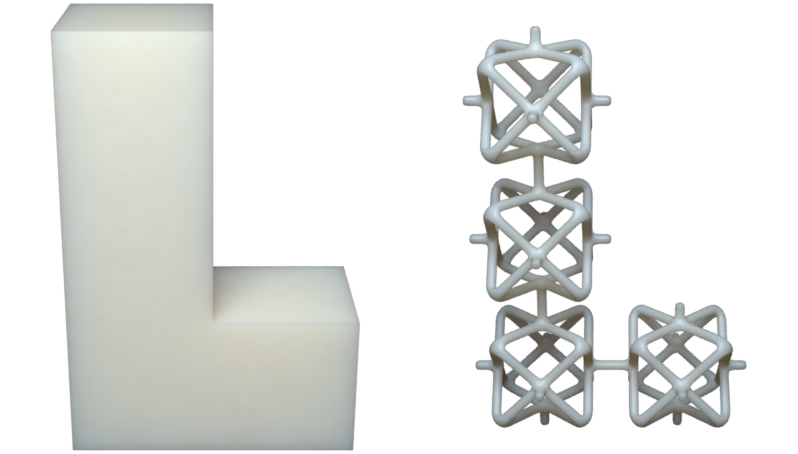
Guide hex mesh (left) and the tiled result (right).
In fact, the guide hex mesh does not need to be axis-aligned. The single cell wire network would be warped to fit inside each hex using tri/bi-linear interpolation. An example is coming soon.